Radio Button in AppInventor
 There is no RadioButton in AppInventor's components list, so you have to build it yourself. I've saw youtube tutorial how to build RadioButtons based on CheckBoxes. I didn't realy liked that work-a-round, though it works. But that tutorial trow me idea how to build more RadioButton looking ones, out from Images and regular Buttons
Graphical user interface design
To build RadioButton in AppInventor, follow this tutorial:
You will need TableArrangement, Images and Buttons. Also you will need images, that represents RadioButtons status. Build your own thet fits your theme or download from me:
 I named my images as
 rbu.png (unchecked) & rbc.png (checked). Upload this media to your server.
| Component | Property | Value |
|---|---|---|
| Image# | Image | rbu.png or any other image that represents unchecked image |
| Image# | Height | 30 pixels |
| Button# | BackgroundColor | None |
| Button# | TextAlignment | left |
| TableArrangement | Rows | 3 One row will represent one RadioButton |
| The table represent properties other than default | ||

 You may edit other properties to customize look of application, but these changes are mandatory. I preset all my RadioButtons as unchecked by default. Here is it how it looks in AppInventor development screen.
Button4 and Notifier1 is used to test how everything works. Its not mandatory in for RadioButton tutorial.
Programming part (aka AppBlocks)
 I will use two global variables, one for group name. I've called it radioGroupt1. Other variable radioGroup1Variable will be used to store that groups value. Initial radioGroup1 value i set to text “0”. radioGroup1Value is set to text <empty>
 On application initialization we need to have global variable radioGroup1 as a list of all RadioButtons that belongs to this group. In this tutorial I've build just one group, but with a little modification to radioGroup1Switch function (additional argument and and use it in foreach list). Also you need to pass a variables of a list, whom belongs that button and image.If RadioButton groups has more than 3 elements- add more images components to list.
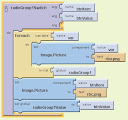
 Now lets analyze “heart” of the program- RadioButton switching function radioGroup1Switch. As I'me mentionet earlier you may edit it a little and you can reuse it for multiple RadioButtons groups. In this tutorial I only used it for one group, so tried to keep it as simple as possible.
!!!!I will analyze it block-by-block.
On any call, funtions sets all RadioButtons to unckecked (
Now lets analyze “heart” of the program- RadioButton switching function radioGroup1Switch. As I'me mentionet earlier you may edit it a little and you can reuse it for multiple RadioButtons groups. In this tutorial I only used it for one group, so tried to keep it as simple as possible.
!!!!I will analyze it block-by-block.
On any call, funtions sets all RadioButtons to unckecked (rbu.png) state. This is done in foreach loop with global variable radioGroup1 witch represents our list of images of specific group.
After a loop I set specific image to checked (rbc.png) state.
The las one block changes radioGroup1Value to specific buttons value.
That's it, as simple as that!!
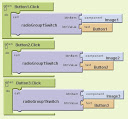
 Now wee need to call our function by button click with two parameter- component and value for radioGroup1value.
If you modified radioGroup1Switch to work with multiple RadioButton groups- then you should pass group on button click together with the rest arguments.
Button click method is quite straight forward, so i do not analyze it deeply, I leave it to yourself.
Testing
 For testing purposes I've added additional button Button4. It's click method checks if value in radioGroup1Value is not empty and show it or displays message about error. For these messages I've used Components-Other components function ShowAlert

Discussion